Learning Vagrant and Ansible Provisioning
After attending Tech Field Day (#NFD10) there was a great deal of discussion around using Vagrant and Ansible for building out environments and provisioning for testing. After realizing that not everyone was familiar with using either of these so I figured that I would throw together something in hopes of helping out those who are interested in learning about Vagrant and Ansible. My goal in this post is to show how easy it is to spin up a few nodes and begin learning either tool.
NOTE: Non-Windows HostOS generally results in a better user experience IMHO…
First head over to the VirtualBox website and install VirtualBox for your HostOS of choice.
Now head over to the Vagrant site and install Vagrant for your HostOS of choice.
Next you will need to install GIT in order to pull the packages required from GitHub.
Now with each of the above installed you are ready to pull down the GitHub repo that I created for learning Vagrant and Ansible. This repo will of course be updated as the need arises. And of course as others consume this and provide feedback.
git clone https://github.com/mrlesmithjr/vagrant-ansible-template.git
cd vagrant-ansible-template.git
```yaml
Now edit the nodes.yml file to define the nodes to spin up for testing.
The include nodes.yml is as below.
```yaml
---
- name: node-1
box: ubuntu/trusty64
mem: 512
cpus: 1
priv_ip: 192.168.250.101
- name: node-2
box: ubuntu/trusty64
mem: 512
cpus: 1
priv_ip: 192.168.250.102
```yaml
An example of defining a much different scenario may look like below.
```yaml
---
- name: app-1
box: ubuntu/trusty64
mem: 512
cpus: 1
priv_ip: 192.168.250.101
- name: app-2
box: ubuntu/trusty64
mem: 512
cpus: 1
priv_ip: 192.168.250.102
- name: web-1
box: ubuntu/trusty64
mem: 512
cpus: 1
priv_ip: 192.168.250.103
- name: web-2
box: ubuntu/trusty64
mem: 512
cpus: 1
priv_ip: 192.168.250.104
- name: db-1
box: ubuntu/trusty64
mem: 1024
cpus: 1
priv_ip: 192.168.250.105
```bash
Now that you have modified and saved out your new nodes.yml file you are
ready to spin it all up.
And this whole environment is as easy as running **_ONE_** command.
```bash
vagrant up
```yaml
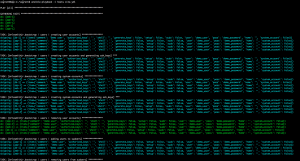
Sit back and watch your nodes deploy now.
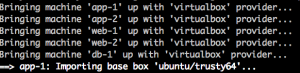

As you can see above the nodes are brought up one by one and an initial
Ansible bootstrap (bootstrap.yml) playbook is executed on each node.
This playbook is doing a few things for us.
- Installs Ansible on each node
- Installs a few Ansible Galaxy roles (To learn how they can be
leveraged in learning)
- creates our host_vars/node vars file (So that we can also run
ansible on each of our nodes from within the Vagrant node as well)
An example of a host_vars file created will look like below.
```yaml
---
ansible_ssh_port: 22
ansible_ssh_host: 192.168.250.101
ansible_ssh_private_key_file: .vagrant/machines/app-1/virtualbox/private_key
```bash
To validate the status of our multi-node environment you run the
following.
```bash
vagrant status
```yaml
And you would see something similar to below.
```bash
Current machine states:
app-1 running (virtualbox)
app-2 running (virtualbox)
web-1 running (virtualbox)
web-2 running (virtualbox)
db-1 running (virtualbox)
```yaml
An example site.yml playbook using Ansible Galaxy roles is included from
the GitHub Repo as well.
```yaml
---
- hosts: all
remote_user: vagrant
sudo: true
vars:
tasks:
roles:
- mrlesmithjr.bootstrap
- mrlesmithjr.base
```bash
Now if you wanted to run the included site.yml playbook which leverages
Ansible Galaxy roles from one of our newly provisioned Vagrant nodes we
would do the following.
Connect to one of the newly provisioned nodes. (app-1 in this example)
```bash
vagrant ssh app-1
```sql
Now there is a synced folder between our HostOS and our Vagrant nodes
(/vagrant). This allows us to either modify or create new Ansible
roles/plays or tasks which will be synced back and forth.
So to now run our example site.yml we will do the following.
```bash
cd /vagrant
ansible-playbook -i hosts site.yml
```bash
And again sit back and watch these roles be applied to each node we just
spun up.
So there you have it. An easily deployed multi-node environment ready to
play in and the sky is the limit on what you can do now to begin your
journey learning both of these awesome tools.
And when you are all done you can tear down the environment without
losing all of your modifications and/or new Ansible Playbooks. This is
now a skeleton structure for you to share with others in order to do
some validation or additional tasks.
Tear it down.
```bash
vagrant destroy
Enjoy!