Hey, I can DevOPS my Network too! – Manual-configured OSPF (Part 5)
In the previous post we setup our OSPF routing topology auto-configured using Ansible.
Which works really nice when we already know what our variable definitions are
and the end result looks like. But maybe we do not know that yet and
need to model what our topology and configurations will be. Well, this
is a great learning environment to do just that. So at this point you
might be thinking to yourself “We have already configured OSPF and now
I want to manually configure? I must have to blow everything away and
start over right?”. The answer is rather quite simple thanks to our
Ansible role and our variables. I will now show you how to get
everything back to a starting point by only adjusting a few variables in
our group_vars/quagga-routers file.
So to validate that our OSPF configuration from the previous post is still implemented let’s do the following.
Assuming you still have an ssh session established with router1 (r1). If not make sure to do so now.
cd /vagrant
ip route
....
default via 10.0.2.2 dev eth0
1.1.1.0/24 dev eth6 proto kernel scope link src 1.1.1.10
2.2.2.0/24 via 192.168.250.102 dev eth1 proto zebra metric 20
3.3.3.0/24 via 192.168.250.103 dev eth1 proto zebra metric 20
4.4.4.0/24 via 192.168.250.104 dev eth1 proto zebra metric 20
5.5.5.0/24 via 192.168.250.105 dev eth1 proto zebra metric 20
10.0.2.0/24 dev eth0 proto kernel scope link src 10.0.2.15
192.168.12.0/24 dev eth2 proto kernel scope link src 192.168.12.11
192.168.14.0/24 dev eth3 proto kernel scope link src 192.168.14.11
192.168.15.0/24 dev eth4 proto kernel scope link src 192.168.15.11
192.168.23.0/24 proto zebra metric 20
nexthop via 192.168.250.102 dev eth1 weight 1
nexthop via 192.168.250.103 dev eth1 weight 1
192.168.31.0/24 dev eth5 proto kernel scope link src 192.168.31.11
192.168.41.0/24 via 192.168.250.104 dev eth1 proto zebra metric 20
192.168.51.0/24 via 192.168.250.105 dev eth1 proto zebra metric 20
192.168.250.0/24 dev eth1 proto kernel scope link src 192.168.250.101
```bash
As you can see from the output above all of our routing is still
configured and now we want to get back to a base OSPF configuration
without any routing defined in order to manually set this all up.
We will simply do that by modifying our _quagga_config_ospfd_ variable
towards the end of _group_vars/quagga-routers_ file. We will change
this variable from true to false. So let's do that now.
```bash
nano group_vars/quagga-routers
```yaml
Current:
```yaml
quagga_config_ospfd: true #defines if quagga ospfd should be configured based on quagga_ospf_ vars...makes it easy to disable auto routing in order to define your routes manually
```yaml
New:
```yaml
quagga_config_ospfd: false #defines if quagga ospfd should be configured based on quagga_ospf_ vars...makes it easy to disable auto routing in order to define your routes manually
```bash
And to do a quick check to also validate that our OSPF configuration is
in place we can view _/etc/quagga/ospfd.conf_
```bash
cat /etc/quagga/ospfd.conf
....
## Ansible managed: /etc/ansible/roles/mrlesmithjr.quagga/templates/etc/quagga/ospfd.conf.j2 modified on 2015-09-10 13:10:26 by root on r1
!
! Zebra configuration saved from vty
! 2014/09/28 16:51:40
!
hostname r1
password quagga
enable password quagga
log file /var/log/quagga/ospfd.log
log stdout
log syslog
log monitor
service password-encryption
!
debug ospf event
debug ospf packet all
!
!
!
router ospf
ospf router-id 192.168.250.101
log-adjacency-changes
redistribute connected
network 192.168.250.101/24 area 51
!
line vty
!
```bash
Now let's run our Ansible playbook we ran previously but this time with
the above variable changed to false and see what happens.
```bash
ansible-playbook -i hosts playbook.yml
```bash
After the playbook finishes you will see that our ospf configuration has
changed and restarted the quagga service to reflect the changes. So what
does our _/etc/quagga/ospfd.conf_ look like now?
```bash
cat /etc/quagga/ospfd.conf
....
## Ansible managed: /etc/ansible/roles/mrlesmithjr.quagga/templates/etc/quagga/ospfd.conf.j2 modified on 2015-09-10 13:10:26 by root on r1
!
! Zebra configuration saved from vty
! 2014/09/28 16:51:40
!
hostname r1
password quagga
enable password quagga
log file /var/log/quagga/ospfd.log
log stdout
log syslog
log monitor
service password-encryption
!
debug ospf event
debug ospf packet all
!
!
!
!
line vty
!
```bash
And a quick route check again.
```bash
ip route
....
default via 10.0.2.2 dev eth0
1.1.1.0/24 dev eth6 proto kernel scope link src 1.1.1.10
10.0.2.0/24 dev eth0 proto kernel scope link src 10.0.2.15
192.168.12.0/24 dev eth2 proto kernel scope link src 192.168.12.11
192.168.14.0/24 dev eth3 proto kernel scope link src 192.168.14.11
192.168.15.0/24 dev eth4 proto kernel scope link src 192.168.15.11
192.168.31.0/24 dev eth5 proto kernel scope link src 192.168.31.11
192.168.250.0/24 dev eth1 proto kernel scope link src 192.168.250.101
```bash
And to validate that our OSPF daemon is still running and ready for
configuration let's telnet to the daemon again and do some checks in
preparation of manually configuring OSPF.
```bash
telnet localhost 2604
....
Trying 127.0.0.1...
Connected to localhost.
Escape character is '^]'.
Hello, this is Quagga (version 0.99.22.4).
Copyright 1996-2005 Kunihiro Ishiguro, et al.
User Access Verification
Password:
r1> en
Password:
r1#
```bash
Now run the following to validate we are in a base configuration state.
```bash
sh run
....
Current configuration:
!
hostname r1
password 8 easGhRG2CUfNw
enable password 8 uE0E.09Znr01M
log file /var/log/quagga/ospfd.log
log stdout
log syslog
service password-encryption
!
debug ospf event
debug ospf packet all
!
!
interface eth0
!
interface eth1
!
interface eth2
!
interface eth3
!
interface eth4
!
interface eth5
!
interface eth6
!
interface lo
!
line vty
!
end
sh ip ospf
....
OSPF Routing Process not enabled
```bash
As you can see from above we are in a base configuration with the OSPF
daemon running and ready for our manual configurations.
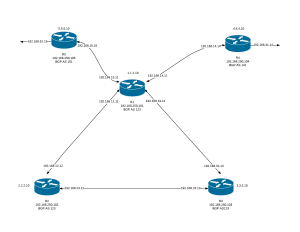
So let's look at our diagram again and start configuring some of our
OSPF topology. You will want to keep this drawing open here on out so
right click and open link in new tab.
We are currently connected to router1 (r1) with our ssh connection but
we now need to connect to router2 (r2) as well. In order to do this we
need to open another terminal window and change to our directory where
our project has been pulled down from GitHub into. In my case it
is _/Users/larrysmith/projects/vagrant-ansible-routing-template_
```bash
cd /Users/larrysmith/projects/vagrant-ansible-routing-template
```bash
Let's connect to router2 (r2).
```bash
vagrant ssh r2
```text
Validate that there are not any routes as we did on router1 (r1).
```bash
ip route
....
default via 10.0.2.2 dev eth0
2.2.2.0/24 dev eth4 proto kernel scope link src 2.2.2.10
10.0.2.0/24 dev eth0 proto kernel scope link src 10.0.2.15
192.168.12.0/24 dev eth3 proto kernel scope link src 192.168.12.12
192.168.23.0/24 dev eth2 proto kernel scope link src 192.168.23.12
192.168.250.0/24 dev eth1 proto kernel scope link src 192.168.250.102
```text
Now connect to the OSPF daemon as we did on router1 (r1).
```bash
telnet localhost 2604
....
Trying 127.0.0.1...
Connected to localhost.
Escape character is '^]'.
Hello, this is Quagga (version 0.99.22.4).
Copyright 1996-2005 Kunihiro Ishiguro, et al.
User Access Verification
Password:
r2> en
Password:
r2#
```bash
Looking at our diagram let's configure router1 (r1) as follows.
```bash
conf t
router ospf
ospf router-id 192.168.250.101
log-adjacency-changes
network 192.168.250.101/24 area 1
```bash
Now validate our running configuration to ensure our configuration from
above is indeed in place.
```bash
do sh run
....
Current configuration:
!
hostname r1
password 8 easGhRG2CUfNw
enable password 8 uE0E.09Znr01M
log file /var/log/quagga/ospfd.log
log stdout
log syslog
service password-encryption
!
debug ospf event
debug ospf packet all
!
!
interface eth0
!
interface eth1
!
interface eth2
!
interface eth3
!
interface eth4
!
interface eth5
!
interface eth6
!
interface lo
!
router ospf
ospf router-id 192.168.250.101
log-adjacency-changes
network 192.168.250.101/24 area 0.0.0.1
!
line vty
!
end
```bash
Let's show our OSPF neighbors and see what that looks like.
```bash
sh ip ospf neighbor
....
r1# sh ip ospf neighbor
Neighbor ID Pri State Dead Time Address Interface RXmtL RqstL DBsmL
r1#
```bash
As you can see from above there are currently not any OSPF neighbors at
this point. Why is that?
Let's now configure router2 (r2) as we did on router1 (r1) by doing the
following on router2 (r2).
```bash
conf t
router ospf
ospf router-id 192.168.250.102
log-adjacency-changes
network 192.168.250.102/24 area 1
```bash
Now validate our running configuration on router2 (r2).
```bash
do sh run
....
Current configuration:
!
hostname r2
password 8 BpxcNI0tq1ucU
enable password 8 yRT9wFRpJ3H5k
log file /var/log/quagga/ospfd.log
log stdout
log syslog
service password-encryption
!
debug ospf event
debug ospf packet all
!
!
interface eth0
!
interface eth1
!
interface eth2
!
interface eth3
!
interface eth4
!
interface lo
!
router ospf
ospf router-id 192.168.250.102
log-adjacency-changes
network 192.168.250.102/24 area 0.0.0.1
!
line vty
!
end
```text
Now while still on router2 (r2) let's do the following.
```bash
end
....
sh ip ospf neighbor
....
Neighbor ID Pri State Dead Time Address Interface RXmtL RqstL DBsmL
192.168.250.101 1 Full/DR 35.006s 192.168.250.101 eth1:192.168.250.102 0 0 0
sh ip ospf route
....
============ OSPF network routing table ============
N 192.168.250.0/24 [10] area: 0.0.0.1
directly attached to eth1
============ OSPF router routing table =============
============ OSPF external routing table ===========
```text
What do you see? You should see we now have an OSPF neighbor which is
router1 (r1).
So now let's jump over to router1 (r1) and show our OSPF neighbors
there as well.
```bash
sh ip ospf neighbor
....
r1# sh ip ospf neighbor
Neighbor ID Pri State Dead Time Address Interface RXmtL RqstL DBsmL
192.168.250.102 1 Full/Backup 38.534s 192.168.250.102 eth1:192.168.250.101 0 0 0
r1#
```text
We see our OSPF neighbor is indeed router2 (r2) on router1 (r1) now as
well.
And if we look at our routes on router1 (r1).
```bash
sh ip ospf route
....
r1# sh ip ospf route
============ OSPF network routing table ============
N 192.168.250.0/24 [10] area: 0.0.0.1
directly attached to eth1
============ OSPF router routing table =============
============ OSPF external routing table ===========
r1#
```text
What did you notice on router1 (r1) and router2 (r2) when showing our
routes?
Let's see what is going on. But before we go further let's write our
configuration and save it on both router1 (r1) and router2 (r2). In order to
do that we need to do the following on both routers.
Router1 (r1):
```bash
wr mem
....
r1# wr mem
Configuration saved to /etc/quagga/ospfd.conf
r1#
```text
Router2 (r2):
```bash
wr mem
....
r2# wr mem
Configuration saved to /etc/quagga/ospfd.conf
r2#
```text
And now exit the OSPF daemon on each router to get us back to a command
prompt.
```bash
exit
```text
Now back on our command prompt on each router (router1 (r1) and router2
(r2)). Let's look at our diagram again and run some ping tests to see
what is going on.
Sitting on router1 (r1) let's run some ping tests to router2 (r2).
```bash
ping -c 4 2.2.2.10
....
vagrant@r1:/vagrant$ ping -c 4 2.2.2.10
PING 2.2.2.10 (2.2.2.10) 56(84) bytes of data.
--- 2.2.2.10 ping statistics ---
4 packets transmitted, 0 received, 100% packet loss, time 3025ms
....
ping -c 4 192.168.23.12
....
vagrant@r1:/vagrant$ ping -c 4 192.168.23.12
PING 192.168.23.12 (192.168.23.12) 56(84) bytes of data.
--- 192.168.23.12 ping statistics ---
4 packets transmitted, 0 received, 100% packet loss, time 3025ms
....
ping -c 4 192.168.12.12
....
vagrant@r1:/vagrant$ ping -c 4 192.168.12.12
PING 192.168.12.12 (192.168.12.12) 56(84) bytes of data.
64 bytes from 192.168.12.12: icmp_seq=1 ttl=64 time=0.000 ms
64 bytes from 192.168.12.12: icmp_seq=2 ttl=64 time=0.302 ms
64 bytes from 192.168.12.12: icmp_seq=3 ttl=64 time=0.269 ms
64 bytes from 192.168.12.12: icmp_seq=4 ttl=64 time=0.380 ms
--- 192.168.12.12 ping statistics ---
4 packets transmitted, 4 received, 0% packet loss, time 3000ms
rtt min/avg/max/mdev = 0.000/0.237/0.380/0.144 ms
```text
What happened? We cannot reach the interfaces on router2 (r2) other than
192.168.12.12 correct? Why is that?
Here is why...
We can reach 192.168.12.12 because we are directly connected to the same
network from router1 (r1) with our interface 192.168.12.11 whereas
2.2.2.10 and 192.168.23.12 are on interfaces on the other side of the
router not directly connected. So what went wrong here and how do we
configure router2 (r2) to allow us to reach those interfaces from
router1 (r1)?
We can fix it a few different ways actually.
One way is to add redistribute connected to our OSPF configuration;
which if you remember from our configuration back on the Auto-configured
OSPF post is what was configured (via Ansible variables - seen below),
but maybe that is not what we want to do in this scenario.
Ansible variables
(_/etc/ansible/roles/mrlesmithjr.quagga/defaults/main.yml_) which
defined which redistribute modes to add.
```yaml
quagga_ospf_redistribute:
- connected
## - kernel
## - static
## - isis
## - rip
```text
But for the sake of validating and learning let's add this on router2
(r2).
So jump over to our ssh session to router2 (r2) and connect back into
the OSPF daemon as we did above and add redistribute connected to our
OSPF configuration.
```bash
telnet localhost 2604
....
Trying 127.0.0.1...
Connected to localhost.
Escape character is '^]'.
Hello, this is Quagga (version 0.99.22.4).
Copyright 1996-2005 Kunihiro Ishiguro, et al.
User Access Verification
Password:
r2>
....
en
....
r2> en
Password:
r2#
....
conf t
router ospf
redistribute connected
```text
Now jump back over to router1 (r1) command prompt and run our ping tests
again.
```bash
ping -c 4 2.2.2.10
....
vagrant@r1:/vagrant$ ping -c 4 2.2.2.10
PING 2.2.2.10 (2.2.2.10) 56(84) bytes of data.
64 bytes from 2.2.2.10: icmp_seq=1 ttl=64 time=0.332 ms
64 bytes from 2.2.2.10: icmp_seq=2 ttl=64 time=0.277 ms
64 bytes from 2.2.2.10: icmp_seq=3 ttl=64 time=0.344 ms
64 bytes from 2.2.2.10: icmp_seq=4 ttl=64 time=0.253 ms
--- 2.2.2.10 ping statistics ---
4 packets transmitted, 4 received, 0% packet loss, time 2998ms
rtt min/avg/max/mdev = 0.253/0.301/0.344/0.041 ms
....
ping -c 4 192.168.23.12
....
vagrant@r1:/vagrant$ ping -c 4 192.168.23.12
PING 192.168.23.12 (192.168.23.12) 56(84) bytes of data.
64 bytes from 192.168.23.12: icmp_seq=1 ttl=64 time=0.313 ms
64 bytes from 192.168.23.12: icmp_seq=2 ttl=64 time=0.291 ms
64 bytes from 192.168.23.12: icmp_seq=3 ttl=64 time=0.298 ms
64 bytes from 192.168.23.12: icmp_seq=4 ttl=64 time=0.255 ms
--- 192.168.23.12 ping statistics ---
4 packets transmitted, 4 received, 0% packet loss, time 2998ms
rtt min/avg/max/mdev = 0.255/0.289/0.313/0.024 ms
```text
Boom! Look there now! Our routing is working from router1 (r1) to
router2 (r2) now. But again this is because why? Because we added
redistribute connected to our OSPF configuration on router2 (r2).
Let's look at our OSPF routes on router1 (r1)
```bash
telnet localhost 2604
....
Trying 127.0.0.1...
Connected to localhost.
Escape character is '^]'.
Hello, this is Quagga (version 0.99.22.4).
Copyright 1996-2005 Kunihiro Ishiguro, et al.
User Access Verification
Password:
r1> en
Password:
r1# sh ip ospf route
============ OSPF network routing table ============
N 192.168.250.0/24 [10] area: 0.0.0.1
directly attached to eth1
============ OSPF router routing table =============
R 192.168.250.102 [10] area: 0.0.0.1, ASBR
via 192.168.250.102, eth1
============ OSPF external routing table ===========
N E2 2.2.2.0/24 [10/20] tag: 0
via 192.168.250.102, eth1
N E2 10.0.2.0/24 [10/20] tag: 0
via 192.168.250.102, eth1
N E2 192.168.12.0/24 [10/20] tag: 0
via 192.168.250.102, eth1
N E2 192.168.23.0/24 [10/20] tag: 0
via 192.168.250.102, eth1
r1#
```text
As you see from the above we now have routes populated from router2 (r2)
to router1 (r1). How about if we look at our routes on router2 (r2)?
```bash
telnet localhost 2604
....
Trying 127.0.0.1...
Connected to localhost.
Escape character is '^]'.
Hello, this is Quagga (version 0.99.22.4).
Copyright 1996-2005 Kunihiro Ishiguro, et al.
User Access Verification
Password:
r2> en
Password:
r2# sh ip ospf route
============ OSPF network routing table ============
N 192.168.250.0/24 [10] area: 0.0.0.1
directly attached to eth1
============ OSPF router routing table =============
============ OSPF external routing table ===========
r2#
```text
What do you see? No routes have been configured to be redistributed from
router1 (r1) right?
Validate from router2 (r2) that you cannot ping the following interfaces
(reference the diagram again).
```bash
ping -c 4 1.1.1.10
....
vagrant@r2:~$ ping -c 4 1.1.1.10
PING 1.1.1.10 (1.1.1.10) 56(84) bytes of data.
--- 1.1.1.10 ping statistics ---
4 packets transmitted, 0 received, 100% packet loss, time 3000ms
vagrant@r2:~$
....
ping -c 4 192.168.14.11
....
vagrant@r2:~$ ping -c 4 192.168.14.11
PING 192.168.14.11 (192.168.14.11) 56(84) bytes of data.
--- 192.168.14.11 ping statistics ---
4 packets transmitted, 0 received, 100% packet loss, time 3016ms
vagrant@r2:~$
```text
We are indeed not able to reach those interfaces as you can see. So
let's solve this another way instead of adding redistribute connected
to our OSPF configuration on router1 (r1).
On router1 (r1) we will define our networks (subnets) in our OSPF
configuration to solve these routing issues this time. What this method
is doing for us is enabling OSPF on the interface in which these
networks are connected, and in turn the neighbor will establish a
connection and our routes will be added.
We will do that by doing the following.
Make sure that you have established a telnet session with the OSPF
daemon on router1 (r1) and execute the following.
Validate that our OSPF configuration looks like the following on router1
(r1) first.
```bash
sh run
....
!
router ospf
ospf router-id 192.168.250.101
log-adjacency-changes
network 192.168.250.101/24 area 0.0.0.1
!
```bash
Now let's configure our networks (subnets)
```bash
conf t
router ospf
network 1.1.1.0/24 area 1
network 192.168.14.0/24 area 1
do sh run
....
router ospf
ospf router-id 192.168.250.101
log-adjacency-changes
network 1.1.1.0/24 area 0.0.0.1
network 192.168.14.0/24 area 0.0.0.1
network 192.168.250.101/24 area 0.0.0.1
!
```bash
Now jump over to router2 (r2) and run the ping tests again that we did
previously.
```bash
ping -c 4 1.1.1.10
....
vagrant@r2:~$ ping -c 4 1.1.1.10
PING 1.1.1.10 (1.1.1.10) 56(84) bytes of data.
64 bytes from 1.1.1.10: icmp_seq=1 ttl=64 time=0.262 ms
64 bytes from 1.1.1.10: icmp_seq=2 ttl=64 time=0.423 ms
64 bytes from 1.1.1.10: icmp_seq=3 ttl=64 time=0.304 ms
64 bytes from 1.1.1.10: icmp_seq=4 ttl=64 time=0.304 ms
--- 1.1.1.10 ping statistics ---
4 packets transmitted, 4 received, 0% packet loss, time 3001ms
rtt min/avg/max/mdev = 0.262/0.323/0.423/0.061 ms
vagrant@r2:~$
....
ping -c 4 192.168.14.11
....
vagrant@r2:~$ ping -c 4 192.168.14.11
PING 192.168.14.11 (192.168.14.11) 56(84) bytes of data.
64 bytes from 192.168.14.11: icmp_seq=1 ttl=64 time=0.312 ms
64 bytes from 192.168.14.11: icmp_seq=2 ttl=64 time=0.394 ms
64 bytes from 192.168.14.11: icmp_seq=3 ttl=64 time=0.315 ms
64 bytes from 192.168.14.11: icmp_seq=4 ttl=64 time=0.337 ms
--- 192.168.14.11 ping statistics ---
4 packets transmitted, 4 received, 0% packet loss, time 3000ms
rtt min/avg/max/mdev = 0.312/0.339/0.394/0.037 ms
vagrant@r2:~$
```bash
Success!!!!!
Now look at your routing table once again on router2 (r2).
```bash
ip route
....
vagrant@r2:~$ ip route
default via 10.0.2.2 dev eth0
1.1.1.0/24 via 192.168.250.101 dev eth1 proto zebra metric 20
2.2.2.0/24 dev eth4 proto kernel scope link src 2.2.2.10
10.0.2.0/24 dev eth0 proto kernel scope link src 10.0.2.15
192.168.12.0/24 dev eth3 proto kernel scope link src 192.168.12.12
192.168.14.0/24 via 192.168.250.101 dev eth1 proto zebra metric 20
192.168.23.0/24 dev eth2 proto kernel scope link src 192.168.23.12
192.168.250.0/24 dev eth1 proto kernel scope link src 192.168.250.102
vagrant@r2:~$
```bash
What is the other way to look at our routes on router2 (r2)? I know, I
am getting a little less forthcoming with all of the details now right?
Well we ARE learning here right? :)
```bash
vagrant@r2:~$ telnet localhost 2604
Trying 127.0.0.1...
Connected to localhost.
Escape character is '^]'.
Hello, this is Quagga (version 0.99.22.4).
Copyright 1996-2005 Kunihiro Ishiguro, et al.
User Access Verification
Password:
r2> en
Password:
r2# sh ip ospf route
============ OSPF network routing table ============
N 1.1.1.0/24 [20] area: 0.0.0.1
via 192.168.250.101, eth1
N 192.168.14.0/24 [20] area: 0.0.0.1
via 192.168.250.101, eth1
N 192.168.250.0/24 [10] area: 0.0.0.1
directly attached to eth1
============ OSPF router routing table =============
============ OSPF external routing table ===========
r2#
```bash
So now I have shown you two different ways on how we can redistribute
our routes from each router into our OSPF topology here. There are of
course; many other ways to accomplish this but this should get you
started.
Now using the diagram go on and configure the remaining routers and see
what your results are. And feel free to report back on your findings so
that others can learn from this as well. Including myself of course :)
**Tip**...If you somehow get things out of sorts....simply run the
Ansible playbook again to get you back into a default configuration from
any one of the routers.
```bash
cd /vagrant
ansible-playbook -i hosts playbook.yml
```bash
Also make sure to save your router configurations as you make changes to
write those configurations out to disk.
```bash
wr mem
```bash
And...validate and decide if you want to save your configuration
changes that were made during this post to GIT. I will let you decide :)
```bash
git status
....
On branch dev
Your branch is up-to-date with 'origin/dev'.
Changes not staged for commit:
(use "git add ..." to update what will be committed)
(use "git checkout -- ..." to discard changes in working directory)
modified: group_vars/quagga-routers
no changes added to commit (use "git add" and/or "git commit -a")
Remember what we changed in the file above? A variable? Is it important? If so, commit those changes and push them up to your GitHub repository.
Also keep in mind that doing our configurations manually we may want to define our Ansible variables differently to dictate our Auto-configured OSPF method. More on this later.
Enjoy!
Up next…Auto-configured OSPF from Manual-configured OSPF…
Comments