Ubuntu UTM Homebrew - Part 1 - Web Filtering
I wrote this guide a few days ago and this solution worked great. But what if you want to have more control of your threat management and build your own. So that is what we are going to do here. We are going to build an inline filtering solution using Ubuntu using ESXi.
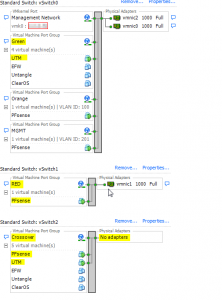
**Note I am using PFSense as my firewall. So it is configured with the first NIC connected to the WAN (RED), and the second NIC is connected to the “Crossover” network and configured with IP 192.168.1.1. (Reference Picture below)***

So here we go.
Build a fresh new Ubuntu 12.04 LTS server.
Configure your first NIC to connect to your vSwitch without any physical NICS. In my setup this network is called “Crossover”. (Reference picture above)
Configure your second NIC to connect to your vSwitch that is used for your LAN network. In my setup this network is called “Green”. (Reference picture above)
Make your /etc/network/interfaces look like this
sudo nano /etc/network/interfaces

auto lo
iface lo inet loopback
#bridge network
iface eth0 inet manual
iface eth1 inet manual

auto br0
iface br0 inet static
address 192.168.1.2
netmask 255.255.255.0
gateway 192.168.1.1
dns-nameservers 192.168.1.1
bridge_ports eth0 eth1
Had to add these lines too. Was getting a consistent timeout pinging firewall every couple of seconds.
bridge_fd 0
bridge_stp off #This is the default but added it as a placeholder
bridge_maxage 0
bridge_ageing 0
bridge_maxwait 0

#IPTables rules
pre-up iptables-restore < /etc/iptables.rules post-down iptables-save > /etc/iptables.rules

#EBTables rules
pre-up ebtables -t broute -A BROUTING -p IPv4 --ip-protocol 6 --ip-destination-port 80 -j redirect --redirect-target ACCEPT
Now run this command
sudo iptables -t nat -A PREROUTING -i br0 -p tcp --dport 80 -j REDIRECT --to-port 8080
Run this command to save the IPTables rules.
sudo iptables-save > /etc/iptables.rules
Now edit /etc/sysctl.conf
sudo nano /etc/sysctl.conf
and uncomment the following
net.ipv4.ip_forward=1
net.ipv6.conf.all.forwarding=1
Now reboot your server and you should be able to communicate out to the internet now.
Open a command prompt and ping your firewall and the server we are building here. You should see request timed out while the UTM server is rebooting for both the firewall and UTM. Then you will start getting a response from the UTM and then the firewall as it builds the bridge. You will see a few drops after the intial ping reply and then all should be good.
Now run
sudo apt-get update && sudo apt-get upgrade
Once that finishes run
sudo apt-get install squid3 ebtables bridge-utils dansguardian havp clamav clamav-freshclam
Now we need to make squid, dansguardian and havp all work together.
sudo nano /etc/dansguardian/dansguardian.conf
and make the following changes
comment out the line that says UNCONFIGURED by placing a # in front of the line.
# the port that DansGuardian listens to.
filterport = 8080

# the ip of the proxy (default is the loopback - i.e. this server)
proxyip = 127.0.0.1

# the port DansGuardian connects to proxy on
proxyport = 8090
Now run
sudo nano /etc/squid3/squid.conf
change
acl localnet src 192.168.1.0/24
(or whatever subnet your LAN is)
and change
http_port 3128
to
http_port 3128 transparent
Now run
sudo nano /etc/havp/havp.config
and add the following
PARENTPROXY 127.0.0.1
PARENTPORT 3128
PORT 8090
ENABLECLAMLIB true
CLAMDBDIR /var/lib/clamav
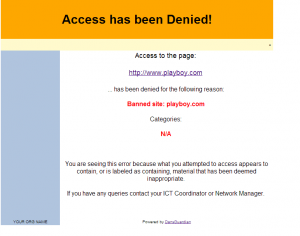
Now reboot your new Ubuntu UTM and you should now be utilizing the UTM for normal http usage. Try to go to playboy.com or some other adult website and you should see the following.

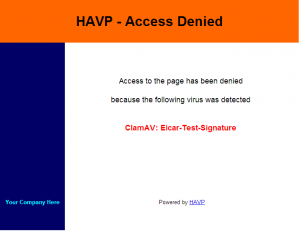
Go to this link and you should see the following.

Once that is verified that it is working. You are good to go. There are many other tweaks and such that you can do with Dansguardian, but I am not going into that here in this guide. But I would recommend looking up how to use the blacklists from Shallalist.
Enjoy!
****UPDATE**** Thanks to Apple and their bullshit you will need to add the following to your squid.conf file to get iTunes working. iTunes apparently has a major issue working through a proxy correctly.
Because we are only redirecting normal http traffic this regexp is the only one required. So add both lines to /etc/squid3/squid.conf and restart squid.
acl Apple url_regex ^https?://([A-Za-z0-9.-]*\.)?apple\.com/

cache deny Apple
While you are in squid.conf you might want to go ahead and add the following as well.
acl Adobe url_regex ^https?://([A-Za-z0-9.-]*\.)?adobe\.com/
acl Windows_Update url_regex ^https?://([A-Za-z0-9.-]*\.)?windowsupdate\.com/
acl Microsoft url_regex ^https?://([A-Za-z0-9.-]*\.)?microsoft\.com/
acl YouTube url_regex ^http://[A-Za-z0-9.]+\.youtube\.com/videoplayback
acl GoogleVideo url_regex ^http://[A-Za-z0-9.]+\.googlevideo\.com/videoplayback
acl OVI url_regex ^https?://[A-Za-z0-9.-]*\.ovi\.com

cache deny Apple
cache deny Adobe
cache deny Windows_Update
cache deny Microsoft
cache deny YouTube
cache deny GoogleVideo
cache deny OVI
**Update**
If you want to monitor your squid logs and get the real IP of the client request do the following. I am using Sarg to squid reporting.
sudo nano /etc/dansguardian/dansguardian.conf
change line
forwardedfor = on
(make sure it is on)
sudo nano /etc/squid3/squid.conf
change line
forwarded_for on
(make sure it is set to on)
sudo nano /etc/havp/havp.config
change line
FORWARDED_IP true
(default is false)
change line
X_FORWARDED_FOR true
(default is false)
sudo /etc/init.d/squid3 restart && /etc/init.d/dansguardian restart && /etc/init.d/havp stop && /etc/init.d/havp start
Now your squid logs will show the correct client IP addresses instead of 127.0.0.1
Remember the flow is Dansguardian, HAVP and then Squid
Part 2 is here
Part 3 is here
Leave a comment